PortTakPi v2 -- Building a Portable TAK Server with AIS, ADS-B, and Real-Time Situational Awareness

A field-deployable Raspberry Pi 4 TAK server with dual SDR receivers, live maritime and aviation tracking, and Node-RED CoT pipelines feeding OpenTAK Server.

Background

This is version two of my portable TAK (Team Awareness Kit) server -- a self-contained situational awareness node that I can deploy in the field, at an incident, or at a remote location without any dependency on existing infrastructure. The goal is a box that boots up, connects its antennas, and starts pushing live AIS vessel tracks and ADS-B aircraft positions into TAK clients on the local network, all without touching a keyboard after initial setup.

Version one proved the concept. Version two tightens the architecture, adds a proper combined web UI for monitoring, and locks in the autostart and resilience behaviour that you actually need when you are relying on it operationally.

Hardware

The build is intentionally compact and rugged:

  • Raspberry Pi 4 (4GB) -- the compute platform. Plenty of headroom for running OpenTAK Server, two SDR decoders, Node-RED, and gpsd simultaneously without breaking a sweat. The RPi4 is a known quantity in this kind of deployment -- well supported, widely available, and the USB 3.0 ports handle the SDR dongles without USB bandwidth issues.

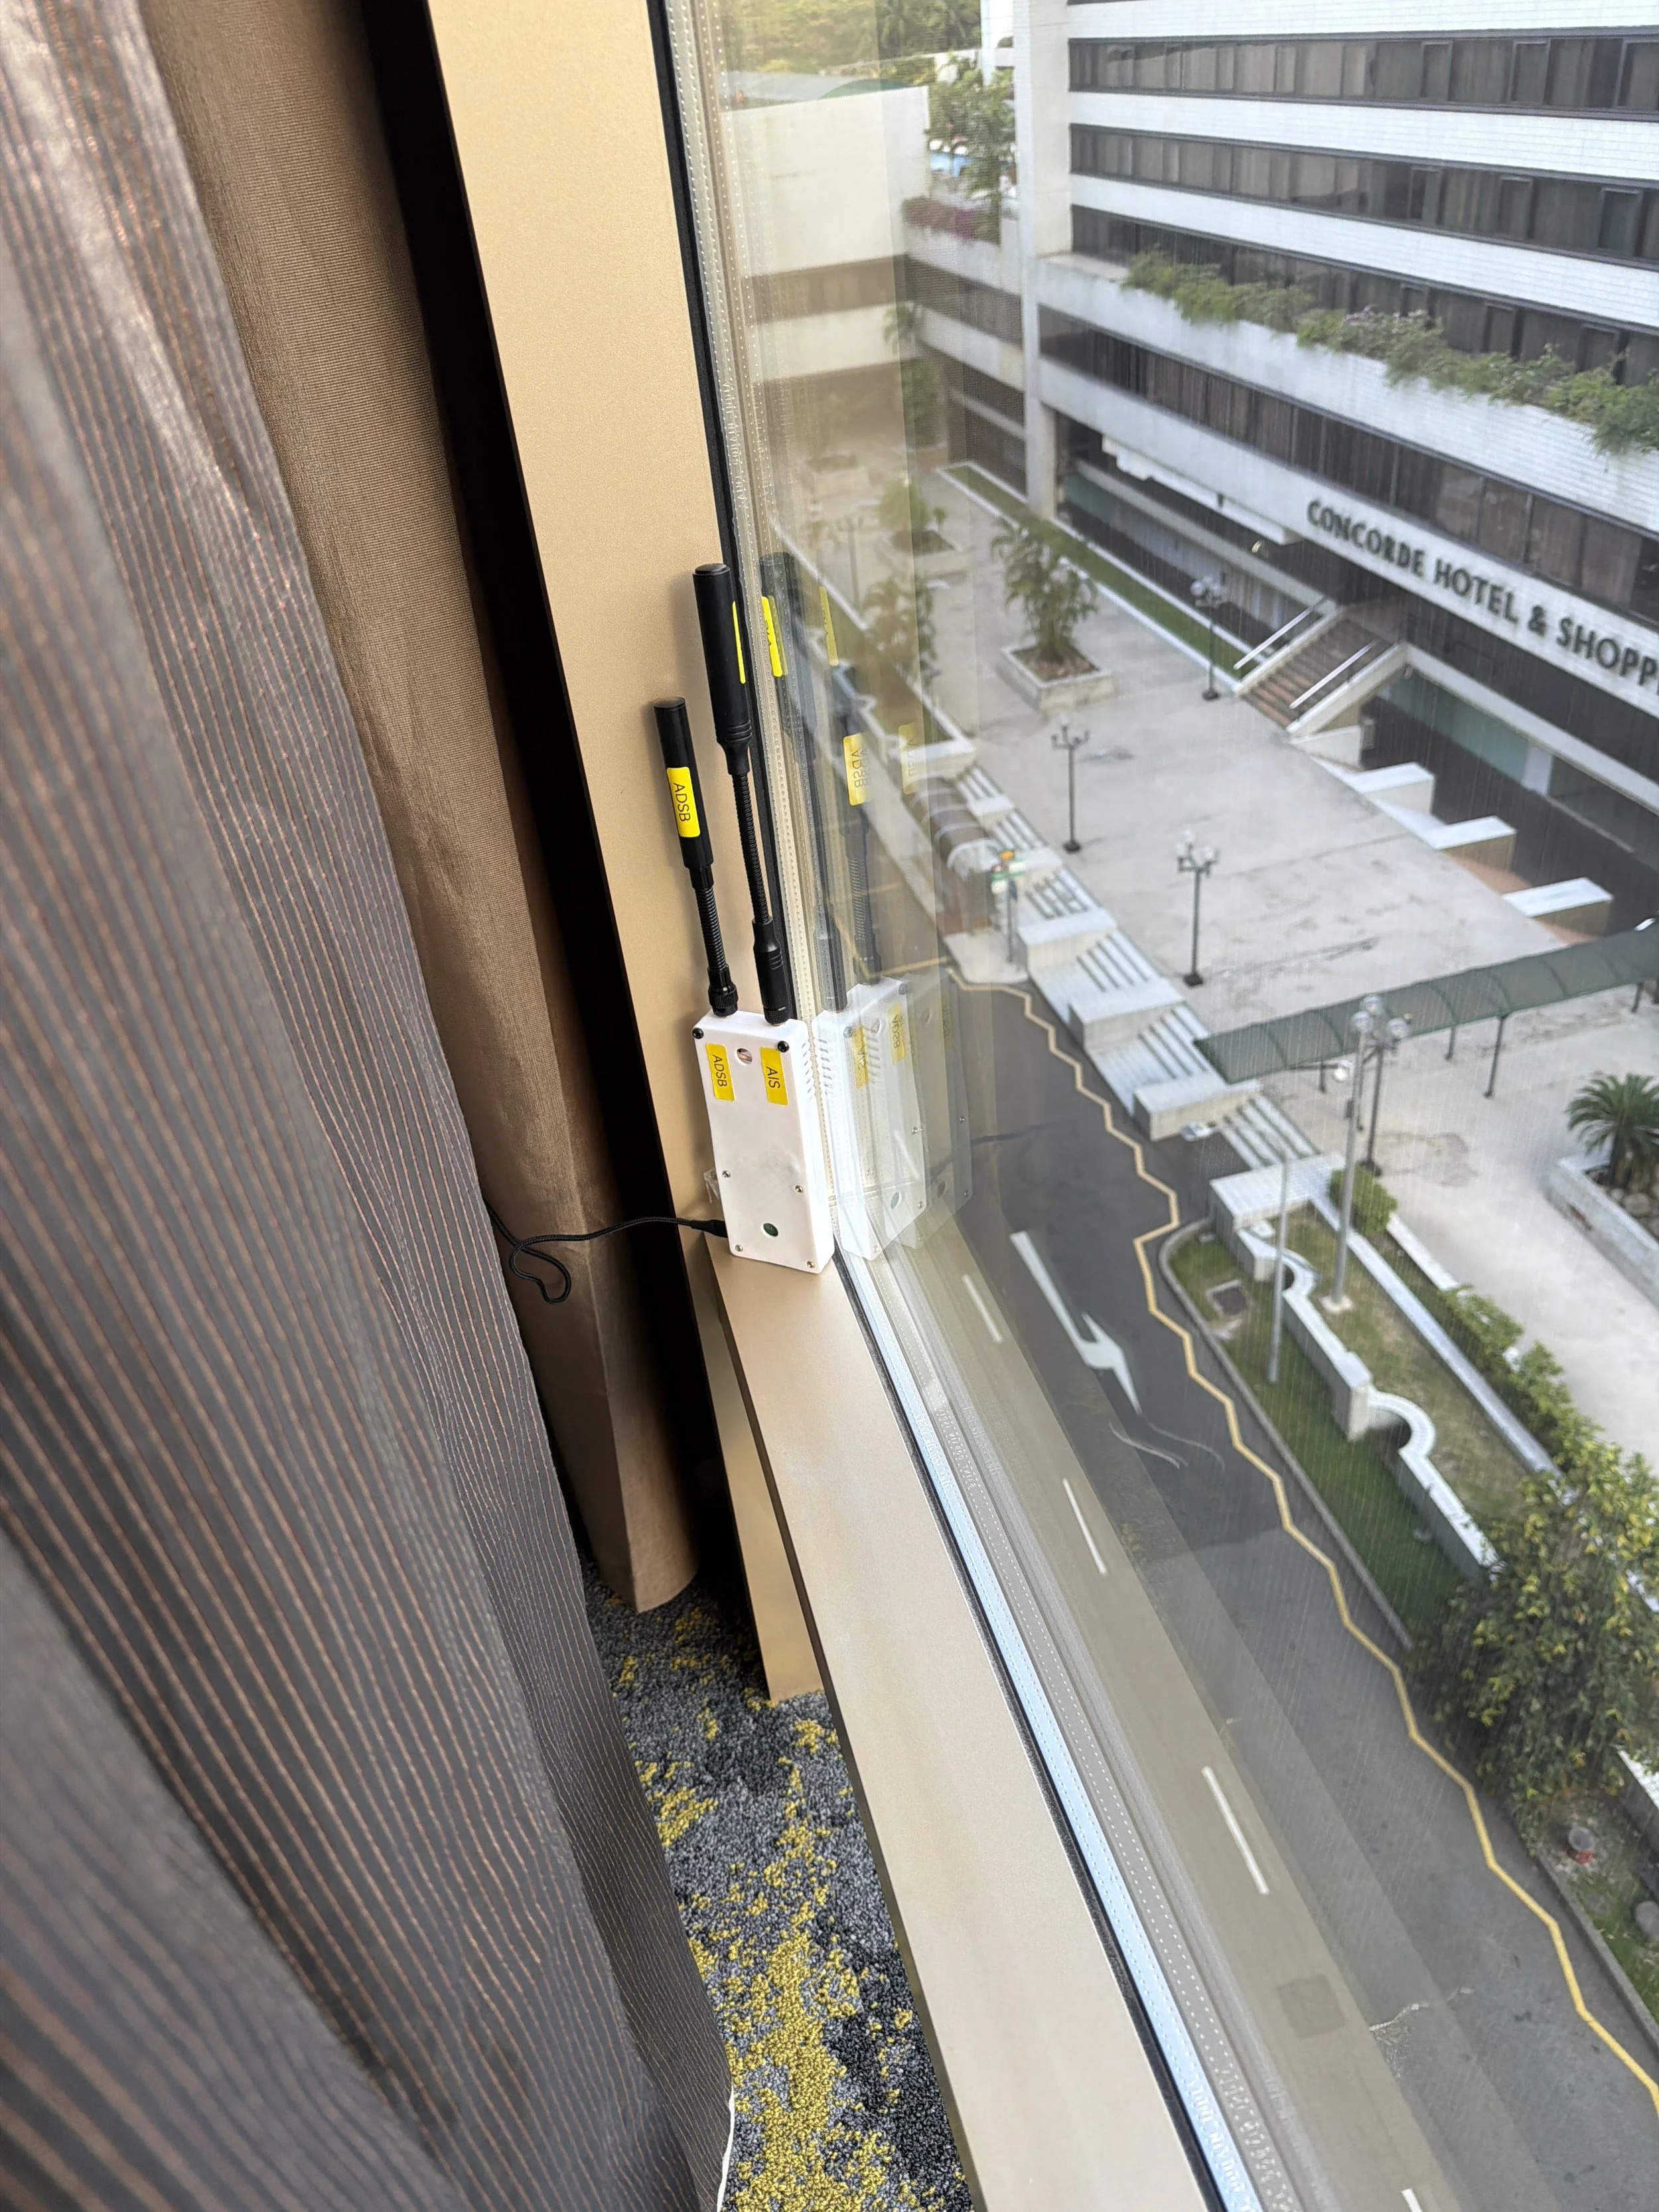
  • 2x NooElec NESDR Nano 3 -- these are the smallest RTL-SDR dongles available and they are ideal for a portable build. One is dedicated to ADS-B on 1090 MHz, the other handles AIS on 161.975/162.025 MHz. Each dongle was pre-programmed with a unique serial number -- 000001090 for the ADS-B dongle and 000000160 for the AIS dongle -- so the software can identify them deterministically regardless of which USB port they are plugged into.

  • uBlox USB GPS -- a stripped-down uBlox GPS module, heat-shrink covered to protect the PCB, connected via USB. This feeds gpsd and provides position stamping for AIS-catcher's web UI, Node-RED flows, and any TAK location services that need a receiver position.

The whole lot runs off a USB-C power source. In the field that is typically a battery bank or vehicle power via a USB-C PD adapter.

Software Stack

The software stack sits on a Raspberry Pi OS Lite base. No desktop environment -- everything is headless and managed via SSH over WireGuard when remote, or directly on the LAN when deployed locally.

The key components are:

  • dump1090-fa -- ADS-B decoder (FlightAware fork)

  • AIS-catcher -- AIS decoder with integrated web viewer

  • OpenTAK Server -- TAK server providing the CoT distribution layer

  • Node-RED -- data pipeline and CoT transformation engine

  • gpsd -- GPS daemon providing position data to the stack

All four services are managed by systemd and configured to autostart on boot in the correct order.

ADS-B with dump1090-fa

dump1090-fa is the FlightAware customised fork of the original dump1090 ADS-B decoder. It handles Mode S and ADS-B message decoding from the 1090 MHz dongle and writes a live aircraft.json file every second to /run/dump1090-fa/.

Configuration is via /etc/default/dump1090-fa. The key setting is specifying the dongle by serial number so it always grabs the right device:

Plaintext

RECEIVER_SERIAL=00001090

dump1090-fa also serves its Beast format output on TCP port 30005, which other tools can connect to. The adaptive gain control is enabled, which automatically adjusts the receiver gain to optimise the signal-to-noise ratio without manual tuning -- useful when you do not know what the RF environment will be like at a deployment location.

One gotcha with fresh Raspberry Pi OS installs: the dvb_usb_rtl28xxu kernel module will grab RTL-SDR dongles before userspace tools can access them. This needs to be blacklisted:

Bash

# /etc/modprobe.d/blacklist-rtl.conf
blacklist dvb_usb_rtl28xxu
blacklist rtl2832
blacklist rtl2830

Without this, rtl_test and all the SDR decoders will fail to open the device.

AIS with AIS-catcher

AIS-catcher (v0.66 at time of writing) is the AIS decoder handling the second dongle. It is an exceptionally capable piece of software -- fast, configurable, and actively maintained.

Configuration is split across two files:

  • /etc/AIS-catcher/config.json -- main JSON configuration

  • /etc/AIS-catcher/config.cmd -- additional command line arguments appended at startup

The JSON config specifies the input device by serial number, the web server port (8100), and the TCP output listeners. The key design decision for this build was making AIS-catcher the TCP server on ports 10110 (NMEA) and 10111 (JSON_FULL), with Node-RED connecting to it as a client. This is the opposite of what you might first reach for, but it is the right architecture -- it means Node-RED can restart without requiring AIS-catcher to restart, and the connection re-establishes automatically.

JSON

"tcp_listener": [
    {"port": 10110, "active": true, "msgformat": "NMEA"},
    {"port": 10111, "active": true, "msgformat": "JSON_FULL"}
]

The JSON_FULL format on 10111 is the one the Node-RED CoT pipeline consumes -- it includes MMSI, position, speed, course, heading, and vessel name in a structured format that is straightforward to transform.

ADS-B Overlay in AIS-catcher

One of the neater features in recent AIS-catcher versions is the ability to pull an ADS-B Beast feed and overlay the aircraft on its own web UI map alongside vessels. Since dump1090-fa is already serving Beast output on port 30005, this is a single line in config.cmd:

Plaintext

-t beast 127.0.0.1 30005

The result is a single web UI at port 8100 showing both vessels and aircraft on the same map -- no need to run a separate aircraft UI. This is particularly useful on a portable deployment where you want to monitor everything from one browser tab.

Node-RED Data Pipelines

Node-RED is the integration layer. It ingests data from both decoders, transforms it into Cursor-on-Target (CoT) XML, and distributes it to TAK clients via UDP multicast.

ADS-B Pipeline

dump1090-fa writes aircraft.json to a tmpfs location at /run/dump1090-fa/aircraft.json every second. Rather than running an HTTP server just to serve this file (which would conflict with OpenTAK Server on port 8080), Node-RED reads the file directly using a file-in node on a 5-second timer.

The flow is: Inject (5s) → File Read → JSON Parse → Extract aircraft array → Split (1 per aircraft) → CoT transform function → TAK node → UDP multicast 239.2.3.1:6969

The CoT transform function is the core logic. It handles:

  • ICAO hex to UID mapping (ICAO-7C6D78)

  • Category-based CoT type selection (fixed wing, helicopter, glider, unmanned)

  • Military detection via hex prefix, callsign pattern, and a knownCraft lookup table

  • Altitude preference (geometric altitude preferred over barometric)

  • Speed and heading extraction for ATAK track vectors

  • Custom icon assignment from the knownCraft database

The knownCraft database is a Google Sheet CSV that Node-RED fetches on deploy and refreshes hourly. It maps ICAO hex codes to callsigns, CoT types, icons, and affiliation metadata. This allows specific aircraft -- military, government, or known local traffic -- to be rendered with appropriate symbology in TAK.

AIS Pipeline

The AIS pipeline connects to AIS-catcher's TCP listener on port 10111 as a client. AIS-catcher pushes JSON_FULL messages as they are decoded, so this is event-driven rather than polled.

Because AIS-catcher's JSON_FULL format is a flat object per vessel update, a normalisation function reshapes it into the nested aisstream.io envelope format that the CoT transformer expects -- allowing the same transformer to work across both the home server and the portable Pi.

The flow is: TCP in (client, 127.0.0.1:10111) → Normalise to aisstream shape → AIS CoT transformer → UDP multicast 239.2.3.1:6969

The AIS CoT transformer applies strict MMSI filtering -- it only emits CoT for vessels that exist in an mmsiIndex lookup table, also loaded from a Google Sheet.

Output

Both pipelines output to the same UDP multicast group: 239.2.3.1:6969. Any TAK client on the local network with multicast enabled will receive all tracks from both pipelines without any per-client configuration. OpenTAK Server on the same Pi can also be used for TCP-connected clients that do not support multicast.

OpenTAK Server

OpenTAK Server (OTS) provides the TAK server layer -- certificate management, client connections, and CoT routing. It runs on port 8080. On this portable build it is the distribution point for clients that connect via TCP rather than listening on multicast directly.

The Node-RED pipelines bypass OTS for multicast output -- the CoT goes straight to the network -- but OTS handles any clients that connect directly to the server, including remote clients coming in over WireGuard.

GPS

The uBlox GPS module feeds gpsd, which runs as a system service. AIS-catcher is pointed at it via its -G system on startup argument, which tells it to use the system gpsd instance at the default port. This gives the AIS-catcher web UI a receiver position for map centering and range ring display.

Autostart and Resilience

All services are managed by systemd with WantedBy=multi-user.target. The boot order works cleanly:

  1. gpsd starts early (network.target dependency)

  2. dump1090-fa and AIS-catcher start after network

  3. Node-RED starts and its TCP client nodes connect outbound to AIS-catcher's listeners

The TCP client/server relationship is deliberately designed so that if Node-RED restarts for any reason, it reconnects to AIS-catcher automatically without any intervention. A full cold boot brings everything up in under 90 seconds on the RPi4.

What is Next

The current build is feeding local TAK clients via multicast. The next steps for this platform are:

  • WireGuard federation back to the home TAK server so PortTakPi tracks appear on the home COP when deployed

  • Meshtastic/LoRa integration for mesh position tracks feeding into the same CoT pipeline

  • APRS ingestion for amateur radio position reports in the field

  • A proper weatherproof enclosure with panel-mount connectors for the antennas and GPS

Version two is genuinely operationally useful as-is. Boot it up, plug in the antennas, and within a couple of minutes the local TAK picture has live aircraft and vessel tracks with no cloud dependency.

Portable Pi update - new capabilities!

IMG_7325.JPG

I have just got back from a week long drive throughout NSW, I even managed to squeeze in some radio play.

Recently as part of a SOTA demo, I pulled the Portable Pi set up out to also show it off. To my horror I discovered the 12v to 5v step down that powers my pi was NOISY - like s5-s7 in the relative radio silence of a SOTA summit.

Additionally, there is a quirk of the Samsung Galaxy A Tab forms a central component of the portable kit, it needs a very defined voltage to charge while turned on. 2 birds with one stone! The powerworx Anderson power pole to 2 female USB (3A) - they are SILENT, it's amazing.

So while the picture below looks like a MESS, it was taken after I did some troubleshooting (no audio, had the mic and the audio cable around the wrong way - DUH)

Below is my 817ND, Raspberry Pi3, USB GPS, ZLP Audio interface, 40w Amp (not used in this project...yet), Light Saver Max Solar & Lithium power pack, SOTA Beams Voice Compressor and the hub of the whole operation is the SOTA Beams Anderson PowerPoles distrobution box.

IMG_7327.JPG

So with the hardware sorted, some new capabilities have been added. HF APRS using FSK on 40m (below was one location packet from the testing location). While 30m is the normal HF APRS band, that band is restricted to the highest license level in Australia so there is a small community using 40M here.

Screen Shot 2018-08-22 at 17.03.09.png

Also added recently was the super new mode of FT8CALL, the FT8 speed but actual keyboard contacts on HF bands. I managed to have 2 with the West Coast USA as well as Philippines.

Check out the new mode on the video below 

PowerFilm LightSaver Max

PowerFilm LightSaver Max - a rollable solar lithium battery  

Stats: 

18000 mAh

2x 2.5A USB

12v max 5A

Rollable solar panel


Solar charge 6-8 Hours

Wall charge (USB-C) 3 hours

My desired use:

Directly connect the LightSaver Max (LSM) to my Yaesu FT817ND for extended portable Amateur Radio operations, additionally allow charging of my mobile phone, my 7in android tablet used for logging in the field along with assorted miscellaneous charging such as GoPro for recording, my headlamp for night operations etc.

During the day time I would like to see if the, when unrolled and placed in the sun, will the solar panel pass an increased voltage spike along to the radio. Based on the provided specifications from the suppliers, the following use times are calculated:

LSM contains an 18000mAh battery that would allow

Yaesu 817ND

TX      2000mAh       9 hours total transmitting

RX      450mAh        40 hours total receiving

Charging               

iPhone 2900mAh       6 times from 0-100%

Tablet  3450mAh        5 times from 0-100%

Please note these are not combined or simultaneous use calculation but individual single item calculations.


Conclusion: as per the video the LSM performed brilliantly. Delivering a smooth quiet 12.2v for over 2 hours of use, plus charged my phone and tablet to get the battery down to 6/10.  


DiveMaster life - post graduation

My first decent underwater selfie


It has now been a couple weeks since I graduated as a DiveMaster here on Gili Air, Lombok, Indonesia.

Another Amazing Island Sunset

I was able to spend a week in Bali last week at Mum & Dad’s house using all of their WIFI and hot water - things that are sorely lacking on Gili Air.

My feet! After the shoeless life on Gili Air they needed work!


Now I am back on the Island, my days have been filled with helping out in the shop as well as tagging along as qualified DM to assist Instructors with students who require assistance as well as taking photos and videos to share with you!

Ornate Ghost Pipe Fish

I will be posting a series of blog posts in the coming weeks about Island Life and things that people should be aware of when traveling / living long term on Gili Air, Indonesia.

TRAVEL: Labuan Bajo, Indonesia


Flying east from Bali, Indonesia across tiny islands ringed in gold and turquoise, over fishing villages and mountains you come in to land over yet another cluster of islands into Labuan Bajo airport, new, white and shiny. Soak it in. It's the newest building in 'Bajo! 


Straight away I noticed the striking difference in the faces of the Flores people compared to the Balinese and Javanese. They look almost exactly like the Timorese - Big wide smiles. Slightly curly hair. It felt so comforting. Reminding me of my time in East Timor in 2008. 

'Bajo is a growing port town and also the gateway to the Komodo National Park. The national park is a magnet for divers and adventurers alike. 

We specifically went to Bajo to do two things. See the famed Komodo dragons and to dive. We spent 7 days in Bajo, diving almost every second day.  A boat trip to most dive sites is around 1-2 hours. Our longest day included a guided walk within the National Park on the island of Rinka, a neighbour to Komodo. On the small island is a ranger station where the rangers live and base from - they have two main roles. Act as walking guides and to show the dragons The Rinka dragons are about 1/3 smaller than Komodo's due to evolution. Rinka's giant lizards are still 2-3m long. Our guide cheerfully informed us that they climb trees until they are too big then just hunt on the ground for small deer, birds and other Frankie sized prey. 

A day trip to Rinka can still fit in two dives later in the day however a trip to Komodo is about 5 hours one way from 'Bajo. With time not on our side as well as a hunger to dive in one of Asia's greatest sites - Rinka it was. 

Diving:

I can't talk about 'Bajo without talking about the diving. The best way I can describe the life around the national park - Prolific and Jurassic Park-like. Every fish, every Turtle, every Nudi was bigger, brighter and totally amazing.

We stayed with Blue Marlin in Komodo - can not recommend them as a dive company and lodging more highly. Loved it. 5 stars for me.

Check out my other travel posts : Here

Perhentian Islands, Malaysia

Getting there 


The Perhentian Islands are approx 25km off the north east coast of Malaysia, just south of the Thai border.

Flights are multiple times per day from Kuala Lumpur to Kota Biru, the nearest mainland airport. Then it is a 60km drive to the coast with any one of the friendly local taxi drivers. Before you depart KL, it is advisable to call your accomodation on Perhentian and confirm boats are operating to the island that day, particularly early in the season. We were caught out a bad weather front swept through as we arrived and no boats were operating.

Boats are either booked by your accomodation or tickets purchased at one of the local Kuala Besut ticket agents.

The boat ride from Kuala Besut to Perhentian is approx and hour. If the sea is rough be prepared for a bumpy ride.

Where to stay

We stayed on the ‘big Island’ Perhantian Besar at Abdul’s Chalets. Abdul’s afforded the best mix of location, privacy and quality.

Abdul’s has its own ‘home reef’ located within a roped section for snorkelling away from boats. Many other shallow reefs are within a 15 min walk of your front door.

Large parts of the big island are accessible only by boat and the hotel is more than happy to organise for you.

What to do

Anything in the water!

Perhentian is set up for watersports, be it scuba diving, snorkelling, turtle spotting, or relaxing on a beach.

Highlights

Calm water frontage

Lowlights

Not being told by our hotel that there was no boats operating, leaving us stranded in Kuala Besut - check with your hotel (particularly in shoulder season) about access.

Don’t forget to bring

Sunscreen and a towel

Langkawi, Malaysia

Langkawi has the best of both worlds - fantastic rainforests and amazing beaches and watersports. A huge proportion of the island is rightfully protected as a GeoPark ensuring protection and eco management. 


How we got there

Langkawi was our first destination after flying overnight Sydney to Kuala Lumpur. A quick transfer to the new KLIA2 AirAsia terminal saw us on our way for a quick 1 hour flight to the beautiful and relaxed island of Koh Langkawi

Things we saw or did

Here are some of the AMAZING activities we go up to:

Day sailing on a 40ft Catamaran with Rampant sailing that included laying about in their jacuzzi net behind the boat or laying in a hammock suspended between the hulls while anchored in a protected cove for lunch. Not to mention the open bar on board. Itis not hard to see why these guys are rated as the Number 1 thing to do in Langkawi by TripAdvisor

½ Day kayak tour of the mangroves within the GeoPark including a visit to limestone caves and the fish ‘farm’ located at the base.

A not to be missed trip up into the rainforest on the Langkawi Cable Car giving you a spectacular view over the beaches and islands.

A visit to the state symbol at Eagle Square featuring a huge Brahminy Kite statue.

How we got around

We quickly compared the prices of hire cars versus a scooter for the duration of our trip. The scooter was the easy option as I was licensed internationally and had ridden a fair amount before. Also it allowed us the ability to park just about any where.

Amusingly while refuelling I did manage to lock our only set of keys for the scooter under the seat. Before full panic over took the situation a young local service station attendant with particularly small hands managed to get his hand under the seat and retrieve the keys. A lesson was had and in future scooter keys will be on a lanyard!

Food we ate

As with most South East Asian countries, I highly recommend eating in small local cafes or tea houses and street food where ever possible. This ensures your tourist dollars stay in the local community as well as would provide you with fresh good local food. Being Malaysia, I could not pass up fresh hand made Roti, the local hotplate cooked bread that is eaten with many meals. Langkawi also has a strong middle eastern population so there is no shortage of abab stands as well.

How we got connected

As with most connected travellers, if there is a connection available at a reasonable speed and reasonable price we will connect. Because we have little need for calling while in Malaysia we chose a prepaid provider that would offer us the maximum data available. We used Internet of Xpax that is a user of the Celcom network within Malaysia. One of the benefits was that should be go over our included data we were provided 3 30min windows a day to access as much data as we could use.

I would always suggest buying local sim in each country as it is astronomical the chargers providers from home charge to roam - much less use data. The website below is full of crowd sourced information relating to costs and access in each country.

http://prepaid-data-sim-card.wikia.com

Interesting facts

The entire island of Langkawi is tax free. There is no tax on luxury cars, alcohol, chocolate etc. Think a whole island duty free. Frankie was able to purchase 1lt of Vodka for the equivalent of AUD$10.00

Trailing a new posting style for AsiaTrip2015

As promised, I will be still posting about this trip through Malaysia, Myanmar and Thailand. However I wanted to trial a new style. While other bloggers talk about things to do and see, I will write about the things we have done, places we ate - these are not things written in a guidebook that some one has regurgitated - we actually tried them so can talk honestly about them.

I will be using these main themes with others being used on a place by place basis. Let me know what you thing.

In the mean time head to Facebook, instagram or twitter and search #asiatrip2015 and you will see some of our live postings on those sites.

Holiday Plans - April 2015

2048.jpg

Holiday Plans - April 2015

Frankie has been looking at holiday locations for next year. He is looking at being home in Myanmar for the Burmese New Year Water Festival and usually falls around mid-April.

Taking onto the end of that I am planning some dive spots in Thailand as well as some much needed rest and beach time.

Some probable locations are: Kuala Lumpur Krabi Bangkok Chiang Mai

And for the many may Americans who read my blog this should help

Have you been to any of the above, particularly Krabi or Chiang Mai? Suggestions? Diving Suggestions too?

PADI Open Water Diver Certification -Learning to dive pt 1

So its started!!  

I have been wanting to learn to dive since the PADI “discover diving” in Redang Island Malaysia. I found my local store here in Canberra offer a 2 weekend package that combines theory, “confined water dive practice” - code for swimming pool, and then finishing with a weekend demonstrating and exploring those skills in the open ocean to give me the base qualification of “PADI Open Water Diver”. For those that done know PADI is the Professional Association Of Divers International. Back in the early days of diving they set the standards and benchmarks for the training of new divers. They currently train 90% if the worlds divers. I have to say I didn't really have any understanding of the technicalities of this when I signed up.  One of the benefits of the standards is that if I ever want to go diving with a buddy ( you should never dive alone) if they have the PADI base qualification, I know they have been trained in the same safety procedures, same checks, same under water hand signals the whole works.

The process starts when you approach your dive centre to learn to dive. Mine is located in Belconnen, Canberra  - some 1 and a half hours from the ocean.  The intro night is where you meet, are talked thought the forthcoming course, measure up for wetsuits and other gear as well as the all important Dive Medical. No use getting down to 18m and realising your lungs are shot.

Starting bright and early the next saturday - the theory starts. Hardly arduous concepts but none the less it must be learnt.

The next day it time to put that knowledge to the test on the pool with all the equipment on. I have to say the most daunting thing isn't removing my respirator underwater effectively leaving me without air for a few seconds.. its the removing my mask completely - knowing to clear it I need to not breath through my nose until I need to breath out to clear the mask - oh sure that sound simple - but my body keeps wanting to breath in throughout my nose.  I managed to demonstrate the required skills to pass that section.

So that leads us to the open ocean. Today is Wednesday,  tomorrow evening I need to swing past the shop and pick up my dive gear as well as my buddy’s as we are driving down to the coast Friday night, to start mega early on Saturday in the real wet stuff!

Until then - keep thinking about me and not breathing through your nose!


Walking to the top of the highest mountain in Australia: MOUNT KOSCIUSKO

2014-03-15-13.47.10.jpg

We had been planning a trip to see Mount Kosciusko during the off ski season. March 15th was that day! The day was a ‘little’ windy – once we cleared the top chair lift from Thredbo to the “Eagles Nest” we were greet with a temp of -1 including wind chill and 50-70km/h winds.

I will let the video speak for its self, but the day was great. I kept telling Frankie “ This is the highest mountain in Australia, it is not meant to be easy”   As you will see in the video we did not make the true summit due to the weather – good call – within 30 mins of reaching the base and getting in the car, it absolutely bucketed down – that plus wind and -1 temps? Hmm no thanks. 


To keep the cold out – what is better than a cup of tea in nature – nothing I say – nothing at all and the JetBoil really came through.


Narooma: Camping in the rain

2014-03-08-15.58.45.jpg

I really needed this weekend!

We had been planning another quick weekend away. This time it was more a car camping trip to test out our larger, cheaper car or festival tent the Shoalhaven V4 by Spinifex from Anaconda for only $99.

For the price this tent took a battering this weekend. At least 6 hours of solid rain. At one stage I woke up in the middle of the night to find the ground so soaked that the water was simply pooling. 

Not a single drop inside the tent. The only downside is the super cheap pegs.


The ventilation and double door (one within the veranda and one from the opposite side) along with the full body mesh, other than the tub floor, make is perfect for our yearly trip to Tropical Fruits in the hot steamy NSW North Coast hinterland of Lismore. With the waterproof fly fitted it withstood the nights rain.

Another highlight of the weekend was seeing a poor lost lonesome penguin nesting in a tiny sea cave.

The weekend was a great chance to test out a new little toy I picked up a few months ago from Goal Zero. Their USB powered LED “Luna”. A really versatile little light that was perfect for lighting the whole tent.


Update from refund from @kathmandu_live

20140102-080240.jpg

Following my post yesterday  the online customer service team from Kathmandu contacted me to offer some assistance. After a few phone calls they asked for some photos of the issue. Provided. Then another call. Essentially ‘while the designers can't find a fault, you are obviously not happy, so we are going to refund you’. Which was what I wanted the store to say.

So it appears we are now at a conclusion.


Trying to get my refund for the LANSAN Tent from @Kathmandu_Live

20140102-080240.jpg

As I said in my previous posts and videos I had massive issues with the Kathmandu Lansan Light 2p tent

Not least the massive leak we experienced with just a medium dew  (see below) that is common in Australia with hot days and cool nights.

Basically I wanted a refund.  I took the tent back to the store I purchased it from - Canberra Centre - With a digital scan of my receipt plus they could see on my loyalty card ‘SUMIT CARD’ that I purchased it only days before. Instead of processing the refund on the spot for not being ‘fit for purpose” i.e. tent = shelter = dry. In my case tent = wet = not dry, they said they wanted to ‘test the issues’ HMMM ok cool sure keep the tent. We are now nearly 2 weeks later, they didn't call me, I called them to check on progress. I have been informed they have sent it for ‘testing’ and it passed the waterproof testing and they could find no fault. 

The fly not meeting the inner ( the issue I talk about in the videos) apparently is ‘normal’ and all other tents in stock are exactly they same. The store does not have email or an external connection that I can send the picture and videos too but they have asked I bring the photos in. Following this call, I received another from the same store saying can I do with with some urgency as they want to send the images off to the ‘Product design team located in NZ’. Strange but will just be giving them this link, and the link to the after report linked above.

Pretty poor to not refund on the spot, but will keep fighting.


After Action Report - Horse Gully Hut hike and overnight- December 2013

20140103-131608.jpg

Location

Located approx 50km south of Tuggernong ACT in the Namadgi National Park in the Naas Valley.Getting thereFrom Point Hutt Crossing and through the township of Tharwa, keep heading south. Road is tarred until approx 15km north of the turn off to Mt Clear Campground. Trailhead is located adjacent to the Mt Clear Campground.

Gear

  • Burghaus 65lt Biolite pack, purchased Dec 2013, $115AUD on massive write down
  • Kathmandu Lansan 2p 3 season hiking tent (1.85kgs) $249aud also on massive markdown from $699
  • Camelbak 3l Milspec bladder with insulated hose
  • MSR Pocket Rocket butane burning stove
  • Kookaburra Outdoors light mesh fly face vail

Technology

  • Delorme InReach 2way Satellite tracker and communicator
  • Goal Zero Guide 10+ solar panel and 4xAA battery pack
  • Magellan eXplorist 110 GPS
  • iPhone 5 64gig with Lifeproof case

What Worked

The real stand out of the trip would have to be the location. The track was well sign posted along with being well looked after. Bother huts were well appointed for their age (dating from 1940s). Both huts along the trail had a full and clear corrugated iron rain water tank along with brick fireplace. The addition of the fly mesh face veils really lowered my frustration level at flies trying to get into my mouth and climb on my face as I was sweating, while walking around.

What didn’t work

  1. The Tent- firstly it was very small, even with the tiny weight I did not expect to be sleeping shoulder to shoulder. We are both not very tall ( Frankie is 180cm and I am 172) and there was not much room below us feet wise that was not being used. Additionally on the left hand side at the head end, the fly did not come down low enough to cover the mesh body by about 4-5cm. There was no rain the night we camped but there was a heavy dew that is common with warm days and cool nights. From the location of the moisture I can tell it was not condensation. Moisture was coming through into the mesh body from contact with the fly exterior. Every guyline was tight along with every peg point – the tent could not have been tighter. Simply it is going back to Kathmandu.
  2. The lighter – CountyComm Tiny Split Pea Lighter. It is part of my carry every day kit as my emergency firelighter. No matter how many times I fill it with zippo fluid it is dry when I need it – BINNED.
  3. Delorme InReach – As a tracker it is brilliant, as a message sender it is ok, as a message receiver – CRAP. As per the video – there was some dark dark clouds hanging around so I messaged my friend back in Canberra to see on the weather radar if some nasty weather had blown in. He received my message within minutes and replied in a short period of time – yet still by the next morning nothing was received. Additionally while the tracker has ben running on the same set of batteries for over a year, the warning from full battery to shutting down is a tiny red flashing light with less than an hours warning – hard to know you are no longer tracking with only an hours notice.
  4. The pack – the light padding on the shoulder straps is a little annoying as is the velcro ripping sound when you are putting the pack on while full as the height adjustable rotating hip belt sorts its self out.

 What I wish I knew, that I didn’t know before

The water – the huts have a great supply of clean fresh water. While it is always good to plan to carry extra, knowing there was some available would have mean the 4lt (3 in the Camelbak bladder and 1 in reserve Naglene bottle) could have been adjusted.When we got back to the house I weighted my pack after eating all the food and drinking most of the water – 12kgs. Too heavy so will start shaving weight.

Conculusion

Before my overseas readers start commenting that a tarp would be mush lighter to carry – while you are correct, it offers to protection from the army of animals, reptiles or insects that Australia is home to that if they don’t kill you, they will not make your day happy


My first dive

20131024-170004.jpg

This afternoon I did my first dive! It was a beach dive directly off from the Lagoona Redang Resort beach. While only to a depth of 6m, it was fully guided. My group was meant to be 3 plus a guide but Frankie and Ron both aborted after a depth of about 30cm. After all the fiddling around and briefing I forgot the GoPros so can’t actually show you what I saw but the dive was over a reef with trigger fish, clown fish and whole host of others all just doing their fishy thing. 20131024-165927.jpg

20131024-165939.jpg